
Customer Support
How to create a campaign in Flexmail
Campaigns are the primary way to send emails through Flexmail. A campaign allows you to select recipients, define when your message will be sent, and monitor its performance.
Campaign Types
Flexmail supports different types of campaigns:
- Email Campaign for newsletters, promotions, and marketing communications
- Test Campaign for test sends before the final delivery
- Opt-in Campaign for reconfirming your contacts' consent
In most cases, you will use an Email Campaign.
What You'll Need Before You Start
Before creating your first campaign, make sure that:
- you have successfully activated your Flexmail plan
- you have validated at least one sender email address
- you have created the email message you want to send
- you have one or more contact lists or recipient segments
Creating a New Email Campaign
- Go to the Campaigns menu
- Select Manage Campaigns
- Click Create New Campaign
- Select Create New Email Campaign
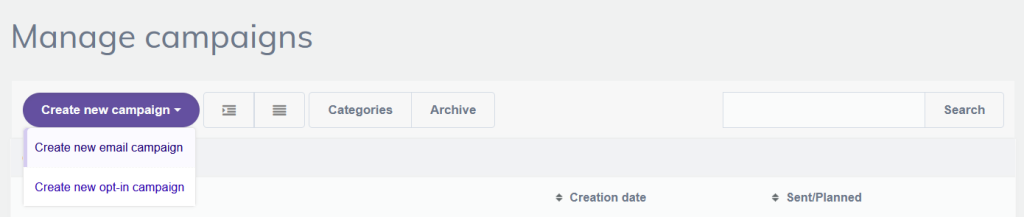
Step 1: Set Up Your Campaign Details
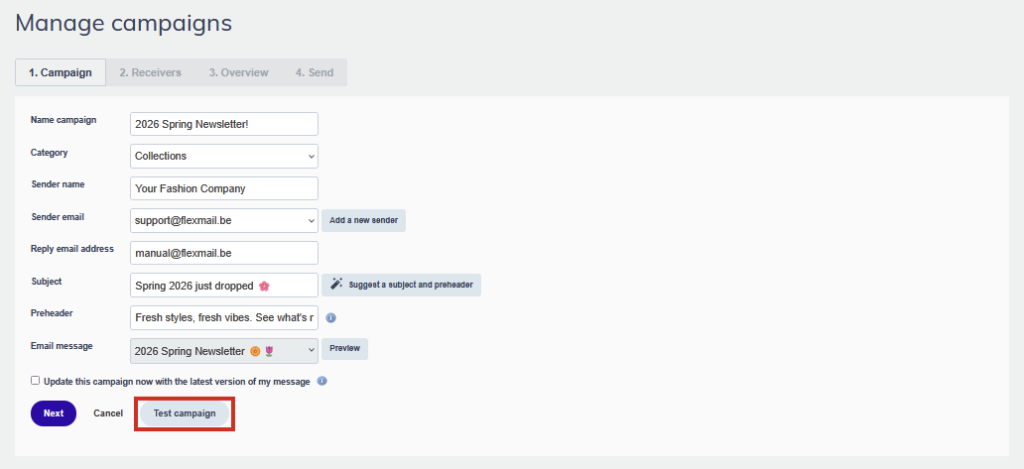
On the first screen, you'll need to configure the following:
- Campaign Name: An internal name that helps you easily identify the campaign.
- Category: Optionally assign a category to better organize your campaigns.
- Subject Line: The subject that recipients will see in their inbox.
- Sender Address: Select a validated sender email address from your account. Consider using the AI tools available to help optimize your subject line and content.
- Sender Name: The name recipients will see as the sender.
- Reply-To Address: Optionally define a different address for replies.
- Message: Select the email message you want to send.
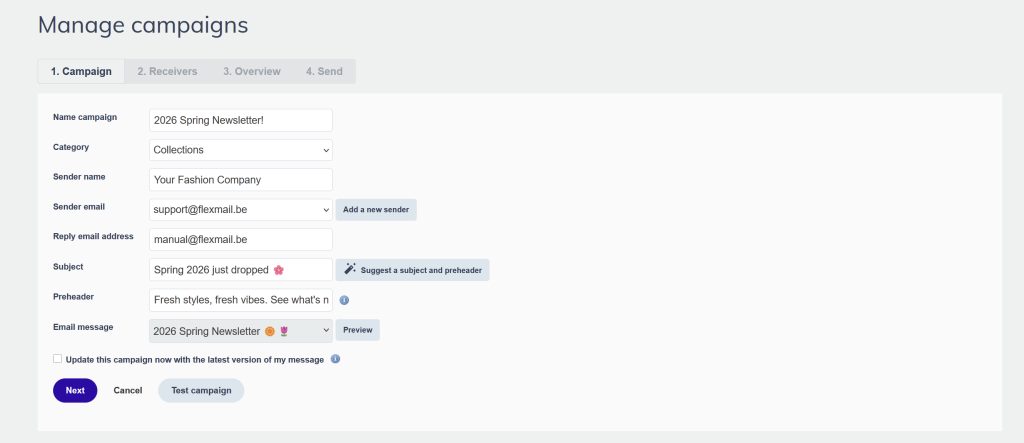
If you plan to continue editing the email before sending, enable "Update this campaign with the latest version of my message" so the campaign always uses the most recent version of your content.
Step 2: Select Your Recipients
Next, choose who will receive the campaign.
You can target:
- Segments
- Interests
- Preference Lists
You can also exclude specific segments from the send.
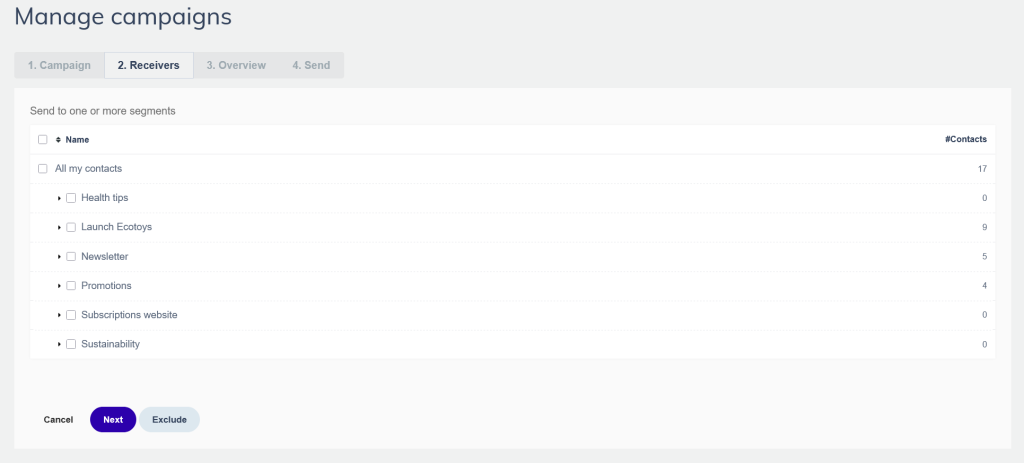
If a contact belongs to multiple selected segments, Flexmail will send the campaign only once to that contact.
Step 3: Review Your Campaign
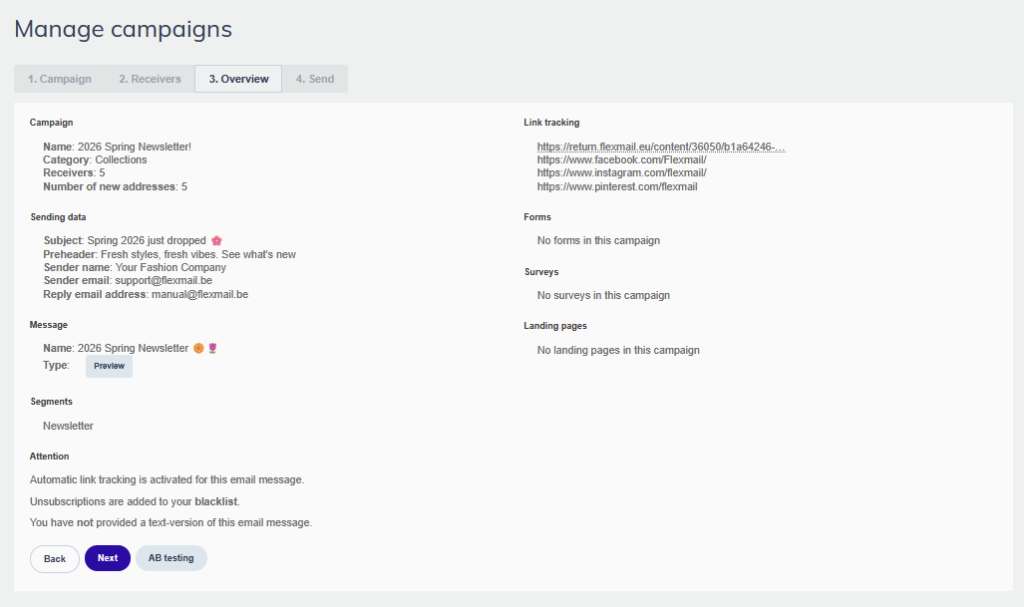
Before sending, Flexmail displays a campaign overview.
Review the following carefully:
- Subject line
- Sender information
- Recipients
- Email content
- Link tracking settings
It is also recommended to include a plain text version of your email for improved compatibility and deliverability.
At this stage, you can also set up A/B Testing to compare different versions of your email.
Step 4: Choose a Sending Option
Flexmail offers several sending options:
- Save: Save your campaign without sending it.
- Send Now: Send the campaign immediately.
- Schedule: Send the campaign at a specific date and time.
- Batch Sending: Deliver the campaign gradually in batches.
You can also configure one or more notification email addresses to receive confirmation once the campaign has finished sending.
Creating a Test Campaign
Before sending to your actual audience, it is recommended to send a test campaign.
- Follow the campaign creation process.
- Select Test Campaign.
- Choose an internal test segment with test email addresses.
- Send the test campaign.
This allows you to verify how the email appears across different email clients and devices before the final send.
Important Information About Opt-in Campaigns
Opt-in Campaigns are used to reconfirm the consent of your contacts.
When an opt-in campaign is sent, recipients are temporarily marked as inactive until they confirm that they still wish to receive your communications.
For this reason, opt-in campaigns should only be used when there is a genuine need to reconfirm subscriber consent.
Pre-Send Checklist
Before sending your campaign, make sure that:
- You are not performing mass edits or deleting contacts while the campaign is being sent.
- You have sent a test campaign.
- The subject line and content are correct.
- You have selected the correct audience.
- The sender address has been validated.
- A plain text version of the email is available.
- You have reviewed the final recipient count.
GDPR and Recipient Consent
Only send campaigns to contacts who have provided valid consent to receive your communications.
Sending emails to contacts without consent, or sending irrelevant content, can negatively affect both your email deliverability and your sender domain reputation.
Frequently Asked Questions (FAQ)
Can I schedule a campaign for a future date?
Yes. Use the Schedule option and choose the desired date and time.
Should I always send a test campaign?
Yes. It is recommended to send a test campaign before every email campaign, even when using templates you have sent before.
Can I edit an email after creating a campaign?
Yes, provided that you have enabled "Update this campaign with the latest version of my message", ensuring that the latest version of the content is used.
Can a contact receive the same campaign more than once?
No. If a contact belongs to multiple selected segments, Flexmail will send the campaign only once.
Read more here: Flexmail Knowledge Base
You haven't found what you are looking for?
Contact our experts, they will be happy to help!
Contact us